Here are proven techniques for turning more of your online marketing audience into clients – adding more people to your list, creating a positive and human image online, writing persuasive copy, and testing new approaches.
Table Of Contents
Reviews & Testimonials
Email Signups
- WordPress
- GoDaddy Domains
- HostGator Hosting
- Mailchimp Setup
- AWeber Setup
- AWeber WordPress Plugin
- MailChimp WordPress Plugin
- Contact Form 7
- Google Analytics
Creating A Reason For Prospects To Join Your Email List
Creating Great Copy
Sales Letter Formulas
Making It Easy For Prospects To Contact You
Testing, Testing… Is This Thing Working?
Email Newsletter
Converting Prospects Into Clients
Published November 2013 on www.JamesEducationCenter.com.
One of the biggest questions that I hear from attorneys is how do we turn our online (or even offline) marketing audience into profitable clients? After all, the point of running a practice is to help people with their legal needs in exchange for compensation.
To help us do that, we will explore a number of different methods to increase our online conversions — from adding more people to your email list, to creating a positive image of your business online, to creating a simple step-by-step process to bring in new clients, and to finally closing the deal. We will also discuss how these online strategies will bring in more business.
Needless to say, most law firms will not be getting direct sales through the internet. Instead, you will find the internet is a tremendous lead generator for your business. These leads can be used to set appointments with potential clients. The information we present below will help you develop a lead generation system that will increase your conversions offline through online prospecting.
Reviews and Testimonials
First, you need to start with the basics and focus on improving your online brand image. Have you ever gone to an attorney site and read through all of their accomplishments? Sometimes it seems inhuman, almost unbelievable. That is a problem, because most people want to know that you are a successful attorney, but are leery when things “look too good to be true”.
This is the part that a number of attorneys might disagree with me on because of legal reasons, but you do need testimonials and reviews of your services. Disclosure: you need to get full privacy disclosures, so you are not disclosing private client information without their knowledge and permission. Do not provide any personal information about your client, let the testimonial come directly from them in their own words. This way, you are not liable for violating client-attorney privilege.
Here is why testimonials are so important. Prospective clients do not believe you and in the end, they will always regard attorneys with some degree of skepticism. There have been too many TV shows about attorneys abusing their power, or they heard legal horror stories from friends.
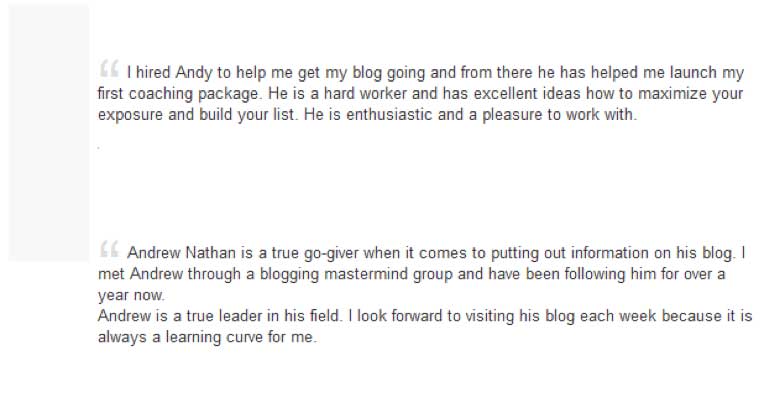
The best way to combat this is to create a positive image through past clients. Have them review your work through Google+ Local, YouTube Videos, LinkedIn, and Yelp.
Using already established sites for placing reviews gives you more credibility than having John B from Santa Monica saying your law firm helped increase his lawsuit amount by 200%. Reviews give you credibility, and trustworthy sources give your reviewers even more credibility.
We will use these external testimonials elsewhere later, but for now focus on getting reviews to one or more of the sites below.
Google+ Local Reviews
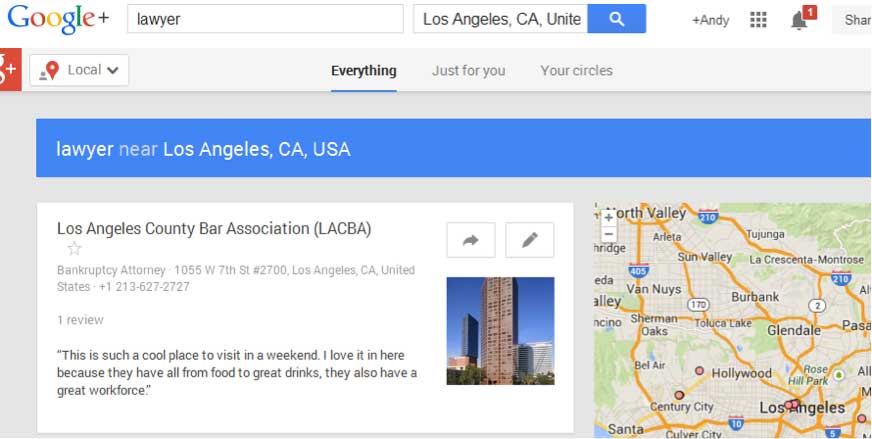
The first review site is Google+ Local, or what used to be called Google Places. Here is why this site is so important for your conversions. Google creates local search results based on a number of factors. One of these factors is reviews from clients. They want to see that your company has a regular flow of reviews from clients positively talking about your business. The more reviews you receive, the more likely Google is to place you near the top of their local search results.
The higher your Google placement, the higher the click-through rate to your site, which in turn means more calls, appointments, and opportunities.
YouTube Video Reviews
The next category of reviews that can help your business are YouTube reviews. Simply ask your client to record their review of your business through a webcam, smartphone, or other recording device. A good format for this type of review is 15 seconds talking about your business, and then 30 seconds speaking about their business or personal triumphs.

LinkedIn Reviews
Next, you can get business reviews on LinkedIn. Have your valuable professional connections provide reviews of your services.
Yelp Reviews
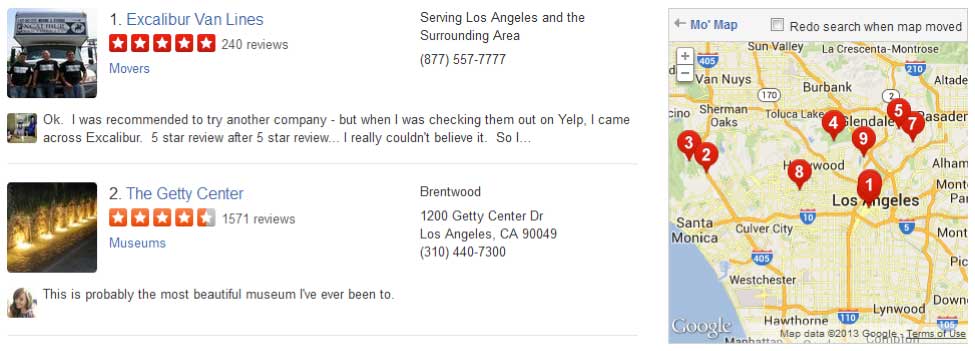
Finally, you can use Yelp reviews. While not as powerful as it used to be with the rise of Google+ Local, Yelp still gets major traffic to their site. Leverage that traffic with positive reviews of your business. Note: Yelp is famous for filtering reviews that seem spammy, so be prepared for some of your reviews to be hidden from public view. This is why we brought this site up last, because the other three versions will get you more publicity with less hassle. However, if your clientele uses Yelp, definitely consider using this service.
Email Signups
Now, that you have testimonials to refer to, we need to get some email signups. Fortunately, you have several ways to add people to your email list.
Before we go into how to add more people to your list, we need to discuss why you need to build an email list in the first place. The reason for this is simple, most of your prospective clients do not know they need your services, until they really, really need your services. Until that time, you need to stay top of mind with them. Adding them to your email list is a great way to remind them of your existence. Later in this ebook we will discuss how to use an email newsletter for increased conversions. For now we will focus exclusively on how to build an email list.
There are a few tools that you will need for this task. Some of them are free and some are paid, which I will note in my discussion.
Also, remember that the first step to building an email list is driving traffic to your lead generation page. While this ebook does not focus on traffic generation, there are a number of ways to drive traffic – from Facebook and LinkedIn ads to Google search to offline marketing integration.
WordPress
The first tool we will discuss is WordPress. Originally a blogging tool, WordPress has come a long way and is now the go-to website creation tool. The great thing is that when you use WordPress with the hosting options below it is automatically installed on your server.
But first we need to talk about your domain and hosting before we can get your WordPress site set up. Fret not, setting up a WordPress site with the hosts below can take as little as 5-10 minutes.
Godaddy & HostGator
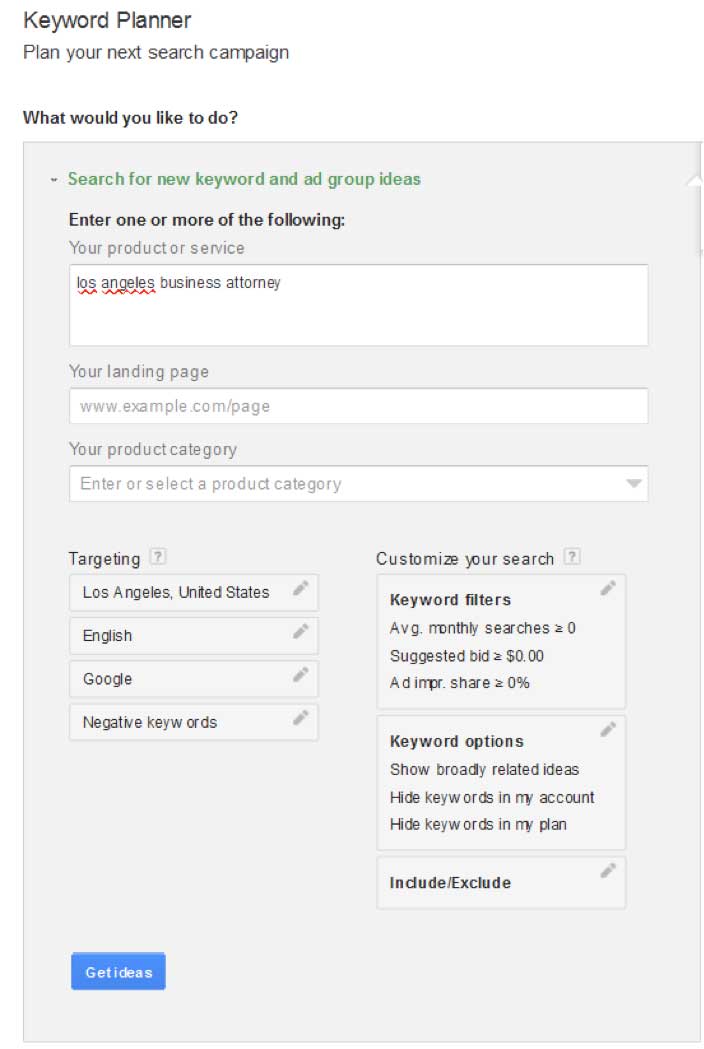
Use the custom filters to create a targeted keyword search.
First, type in any specific keywords you are interested in for your domain name. You can type more than one if you want. Just make sure you put each keyword on a different line.
Second, do you have a specific category for your keyword? More than likely as a law firm, you will want to rank in business or similar legal related categories.
Third, do you have a specific area you want to target? For example, do you only do business in Los Angeles? Then type that in, to get specific, local keyword results.
Fourth, might sound basic, but make sure all of the words you search for are in your specific language.
Fifth, are there any negative keywords you do not want in the results? For example, if you are a trust attorney, you might not want Honesty and Integrity to pop up in the results. Your company should stand for those values, but they are not relevant to the clients you are looking to attract. The keywords need to be relevant to your business, which means that any words that are similar, but not relevant should be listed.
Step 2: Review the keyword results.
If you move your mouse over the keywords it will show you all the keywords in specific groups. That way you can get a feel for which keywords are relevant to your search.
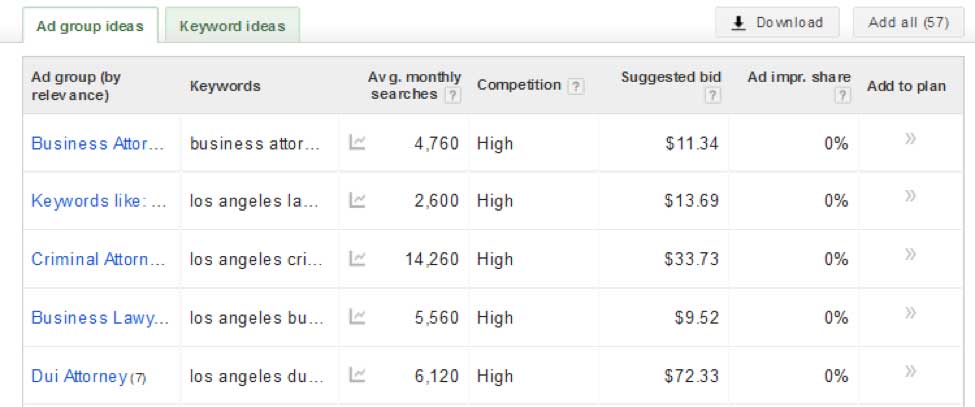
Step 3: Dig deeper into individual keywords. Do not just look at a keyword, and say that looks good. Actually copy the specific keyword (e.g. business attorney los angeles) and paste it into a Google search.
Find out how many competing websites use this term and also which competing firms use it. This is great for two purposes. 1. You know how likely it will be to rank in the top 10 for a specific keyword with your new domain. 2. Use this research to see what other companies say about their services. Take the best ideas and apply them to your website. Use competitive research to not only get you more traffic with the right keyword, but also to help you increase your conversions later.
That way if a competitor promises no contracts, you can say no contracts and only 50% up front retainer. Go that extra mile and start doing research on your competitors at this point.
Godaddy Domains
Now that you have your keywords, start doing domain name searches. Use GoDaddy to see what domain names are available. Sometimes the .com might not be available, but the .net will be. I do not recommend using anything other than .net, .us, or .com if you are a beginner. Generally it is harder to rank a site with .me, .info, and other unusual domain name extensions.
Once you find a name purchase it immediately, because there is no guarantee that name will be available later.
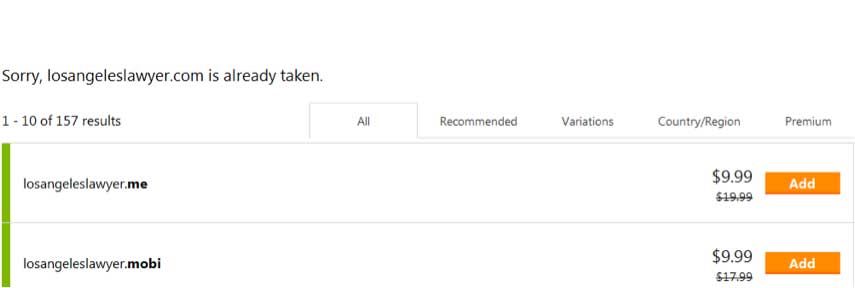
One final note about using GoDaddy – they have amazing domain features, but their hosting is not as easy to use as HostGator or BlueHost. We will walk you through the set up for HostGator after this.
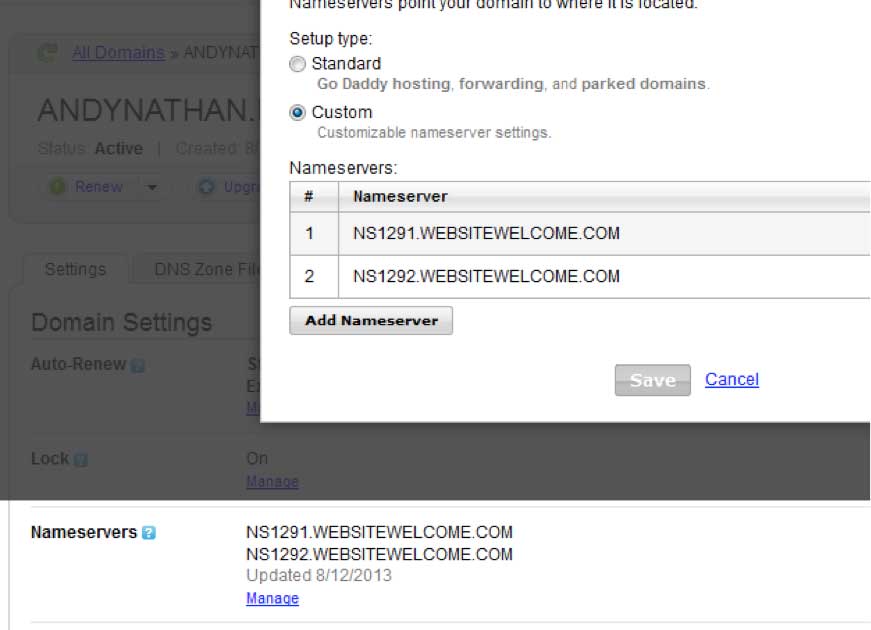
When you purchase your domain, also purchase hosting as well from HostGator or BlueHost. In the welcome email from the hosting company, they will provide you with a Domain Name Servers. You will use this information to connect your domain name and hosting.
Then go to Godaddy and log into your account. Next launch your domain manager, and find the domain you created. We are going to move the nameserver over to HostGator. This is a complicated term for telling your host where to find the website files that will be used when someone navigates to your domain name.
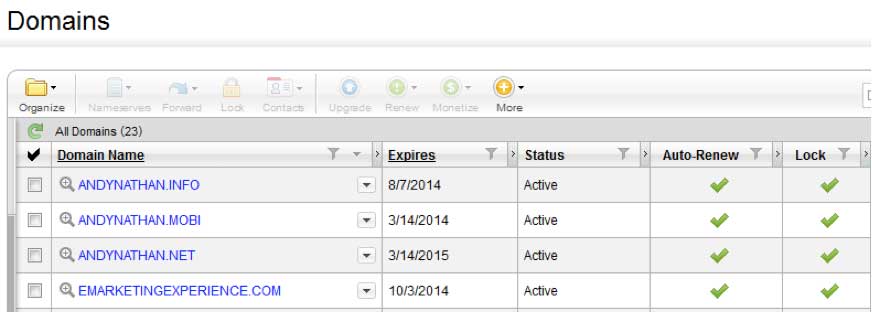
Next, you need to copy and paste the nameserver addresses that you will receive from your host into Godaddy’s nameservers configuration. Click edit, then paste. Make sure that you replace both nameservers and then you are done. It will generally take from 2 to 24 hours for the nameservers to change.
HostGator Hosting
Now that you have your domain name set up, let’s set up your hosting. Just to clarify this for you again. Your domain name is an address for your website. The hosting is the server where the actual website resides.
Using WordPress, you will have an easy framework to manage the upkeep of your site through various plugins and themes that the platform provides. However, we need to set up WordPress first.
Step 1: Check your welcome email for access details to your control panel. Use the provided link to login to your control panel and create your WordPress account. You will only need to do this once. After we set up your WordPress account, you will have a login for WordPress, where you can easily make changes to the site through WordPress using their WYSIWYG (What You See Is What You Get) dashboard.

Step 2: Next, scroll down to the services section of your Control Panel until you find the QuickInstall button. Click the QuickInstall.

Step 3: In quick install, you will see a number of different installation options. One of the first programs available is WordPress. Click on WordPress, and then click on the continue button in the middle.

Step 4: Fill in the WordPress install information.
- “http://” field, keep everything after the “/” blank.
- “Enable Auto Upgrades” field should remain checked, so any WordPress security updates automatically happen without you doing anything.
- Enter what email address you want to use in the “admin email” field.
- Type in an appropriate Title for the site in “Blog Title” field
- Create a short username. Do not make it easy for hackers to hack into your site. The username should be between 6-16 characters.
- Finally, type in your first and last name.
Then click install.
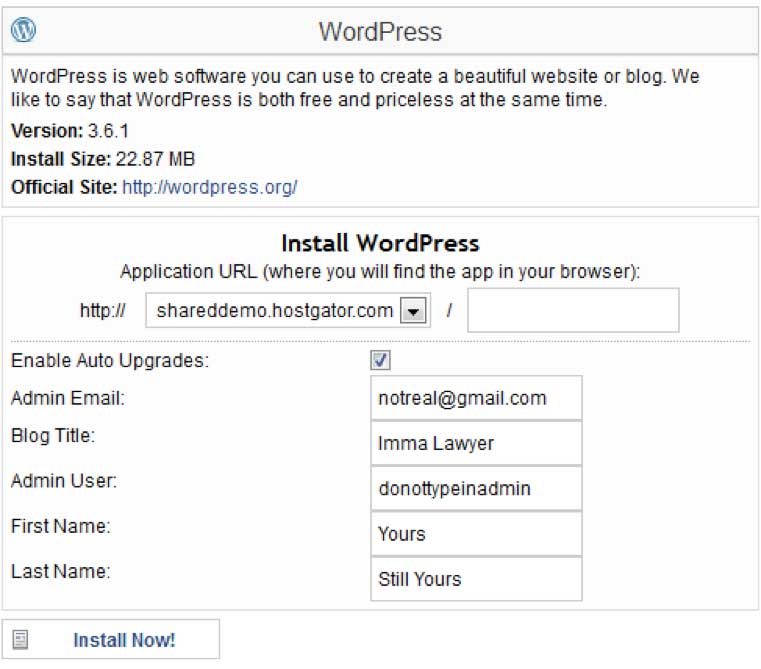
Once you are finished, you should be able to log into your WordPress dashboard immediately. You will be given the link, username, and password to access the WordPress dashboard. Play around with the dashboard and get a feel for how everything works. We will come back to WordPress after we set up an email marketing platform for you.
MailChimp/AWeber
If you want email subscribers, you need a dynamic email platform to help you manage them. The two easiest tools to integrate with WordPress are MailChimp and Aweber. However, GetResponse has been gaining popularity lately, so if you are using that email platform you will be fine as well.
Note: If you are using ConstantContact you will find it challenging to integrate that email service with your WordPress site. While a number of small business owners have been using this email provider over the years, they do not have the type of dynamic integration with WordPress that MailChimp and Aweber offer. In fact, the email sign up form from Constant Contact generally looks downright ugly in WordPress. Not exactly a conversion booster.
MailChimp Setup
You need to create a Mailchimp account first. All that is required to do this is an email address and your name. You will then need to check your email inbox for the welcome email and verify your account with Mailchimp.
Step 1: Once you log in go to Lists. Since you will not have a list set up already, click Create List.
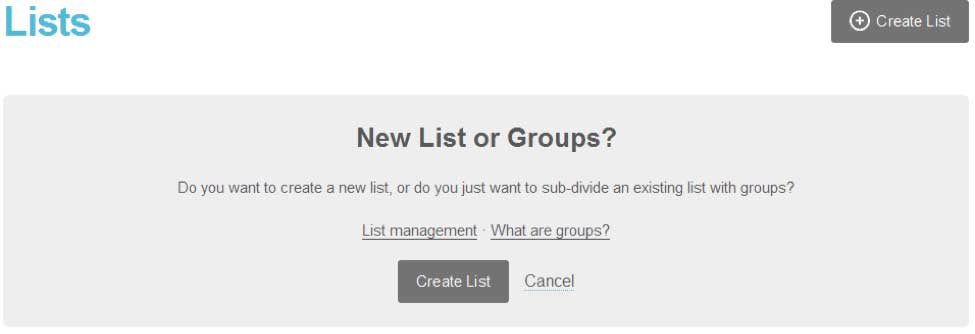
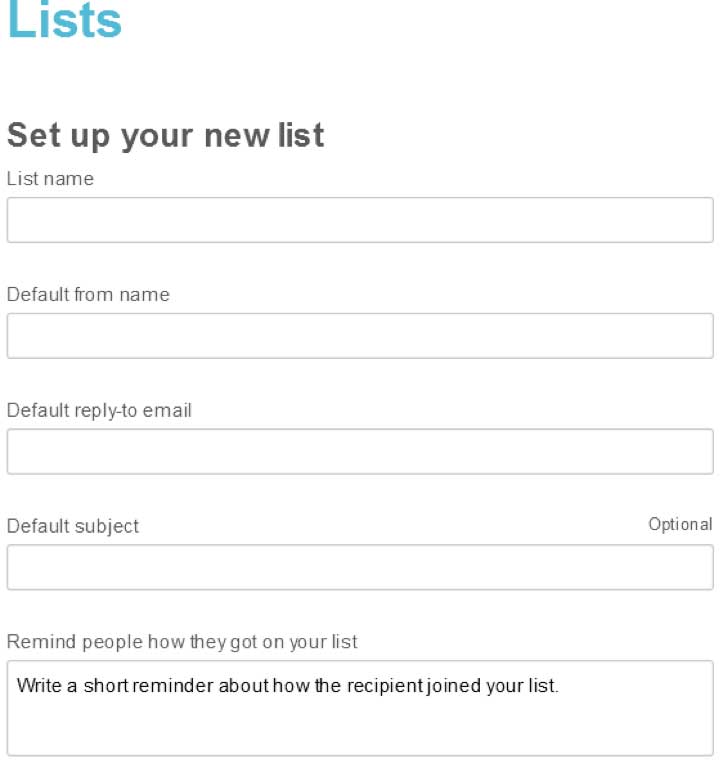
Step 2: Enter in the default information for your list. Follow the prompts, and fill out your List name and description, so you remember who you want to include in this specific list.
Note: You might eventually want more than one email list. In fact segmenting your prospects is encouraged. However, do not overstretch yourself when you get started. Create one list first that you can grow, and then add other lists once your first list becomes a solid base.
Next, you will provide information that will be included in the Welcome email that all new email subscribers receive after signing up for your list.
This includes your default name (either company or personal name), default email address (if you have a specific email address for subscribers enter this in, so you can track when prospects are responding back to you), and a default subject line. Keep the subject line simple, and relevant to your prospects. Something like, “Welcome to our ABC newsletter.”
Finally, even though most prospects will opt-in within minutes of joining your list, remind people why they signed up. Provide them with a benefit or two of being a member of your list. Also, do not forget to include your address and contact information on every email. Mailchimp will ask for this information when you sign up. It is important, because this keeps you in compliance with CAN-SPAM laws.
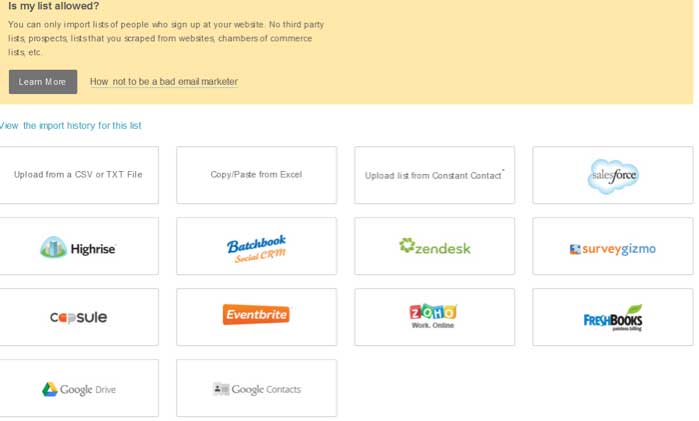
Step 3: Next, import prospects from any previous lists if you want to jumpstart your marketing. Below is a sampling of sites that interact with Mailchimp. Otherwise, you can upload a CSV or TXT file of all your current email subscribers.
Step 4: Integrate your email marketing campaign with WordPress. You can use the MailChimp WordPress plugin, which can be found at http://wordpress.org/plugins/mailchimp/.
![]()
AWeber Setup
While MailChimp offers free plans, AWeber is a paid platform. However, they do provide some additional features in their paid platform like an unlimited auto-responder and integration with credit card processing systems that make it easy for you to add clients to your email list.
Let’s review how to set up a campaign on this platform. Before you do, again you will need to sign up for an account at Aweber.com. You will need an email address and also a credit card, because AWeber has a $1 trial for 21 days to test out their service. Once the trial expires you will be automatically signed up to their monthly billing service.
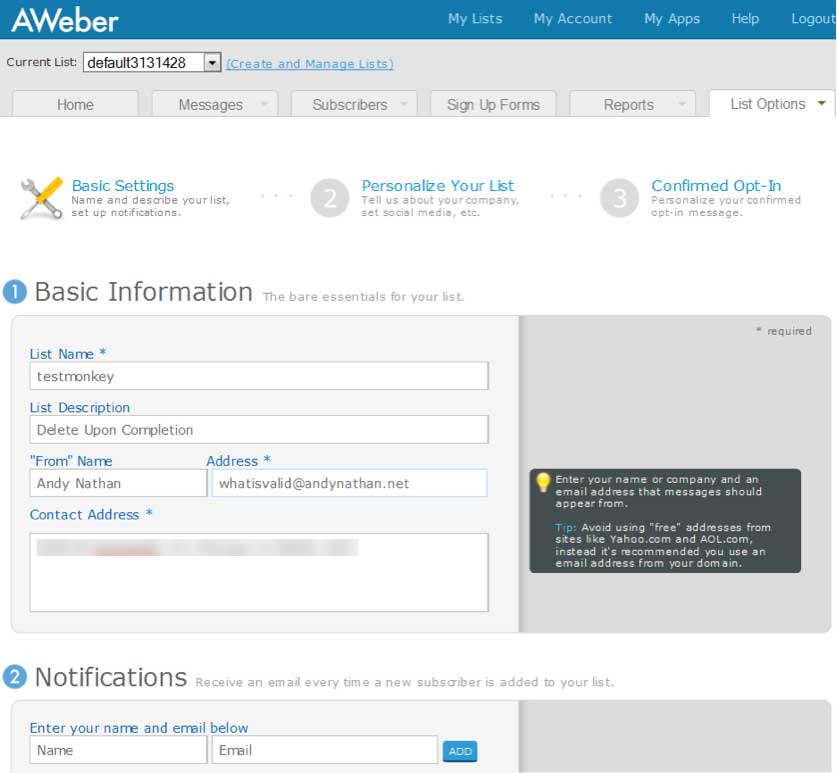
Step 1: Similar to MailChimp, you need to create a list on AWeber. Once you log in, you will see the “create and manage list” option. Click on this, and start filling out the basic information for your campaign.
Make sure you enter a unique List name. AWeber actually turns your email list name into a specific email that you can use to connect to third party vendors like PayPal. Therefore, it is important for you to create a unique List ID. AWeber will tell you if the name is unique or not.
Next, enter the description of the list. Because the list name can be a maximum of 16 characters, you might want a lengthier description of your list here, so you can discern between different lists.
Finally, you need to fill out your basic contact information where subscribers can reach you. You need to include your name and a reply email. Additionally, Federal law requires email to have an address at the bottom of all commercial emails these days, so you do need a physical address for your campaign.
Finally, set up notifications for your email account. If you want to keep tabs of when subscribers sign up and unsubscribe then you can set up notifications for these events. Put in as many emails as you want notified for each list.
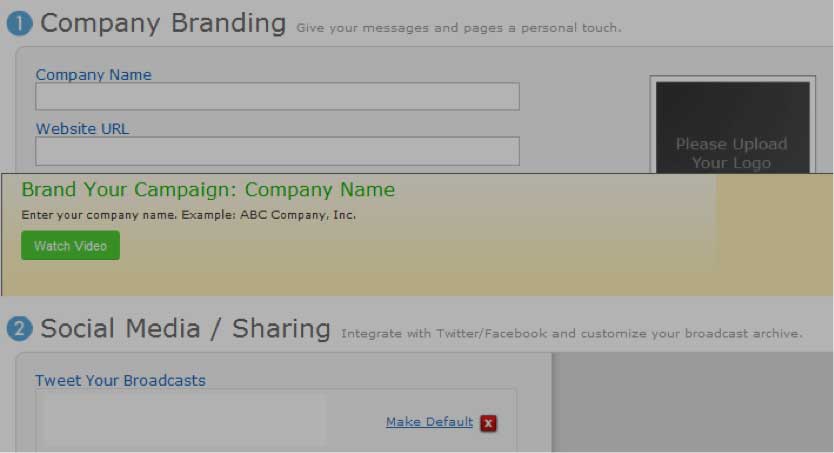
Step 2: Fill out the branding information for your new campaign.
First, make sure you include a logo for your campaign along with your company name.
Second, make sure you integrate your email marketing with your social media accounts. If you have a Facebook page and/or a Twitter account use the social sign up to connect them to your email marketing. That way every time you send out an email to your subscribers you have the option of sharing the email with your fans and followers as well.
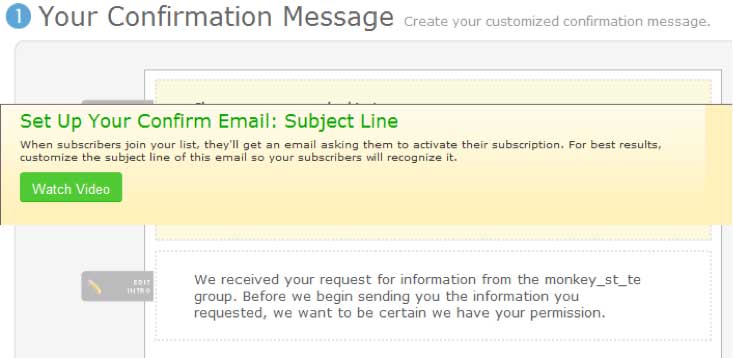
Step 3: Set up a confirmation email. The confirmation email is the email that a subscriber receives immediately after signing up to your list. They need to confirm that they want to join your list. This is called a double opt-in, and it protects you legally against people claiming you violated CAN-SPAM laws.
Remind subscribers in the intro why they signed up to your list, just like you did on the email form. Then put your Email Signature in the closing section. The body is not editable.
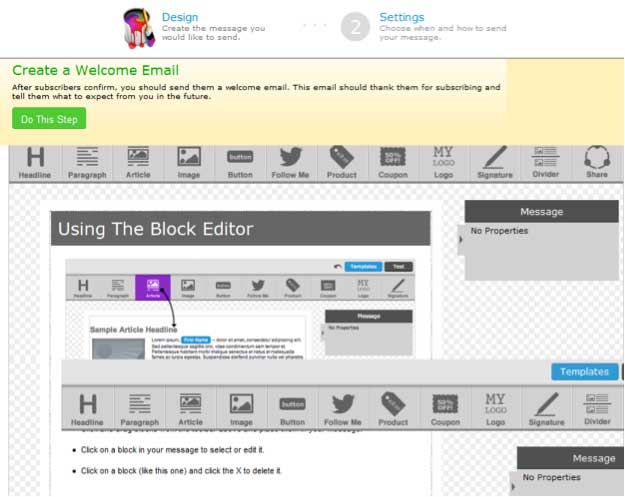
Step 4: Once you set up the required confirmation email, next you need to create a welcome email. If you promised any gifts or want to provide value to your subscribers right out of the gate, this is the email you will use to start providing massive value to your prospects. Remember that the more you give them, the more they will want to keep hearing what you have to say.
Use the block editor feature to create a dynamic email in minutes. The email editor uses drag and drop boxes and offers word processor like features you can use to write the email content right there.
Step 5: Next you need to create a dynamic email signup form. This is another feature that AWeber does so much better than MailChimp. First, their plugin allows you to change forms at will inside of WordPress after they are created. Also, you can use hundreds of email form templates to create a form that best suits your needs.
The key to creating a good email sign up form resides in a good Call To Action that motivates subscribers to sign up for your email list. For example, if you are a divorce attorney who has created a simple ebook helping people cope with divorce, then in your web form you could say, “Free: Learn the Top 10 Things You Need to Know When Going Through a Divorce!”
The word FREE is a very powerful word, especially, when people deal with attorneys. Most consumers have the assumption that lawyers are pricey and do not help people. Give them something for free that knocks their socks off ahead of time. Give it away for free and people might be so shocked that they actually sign up for your email list. Provide tremendous value and you have a potential lifelong client and referral partner.
Step 3: Set up a confirmation email. The confirmation email is the email that a subscriber receives immediately after signing up to your list. They need to confirm that they want to join your list. This is called a double opt-in, and it protects you legally against people claiming you violated CAN-SPAM laws.
Remind subscribers in the intro why they signed up to your list, just like you did on the email form. Then put your Email Signature in the closing section. The body is not editable.
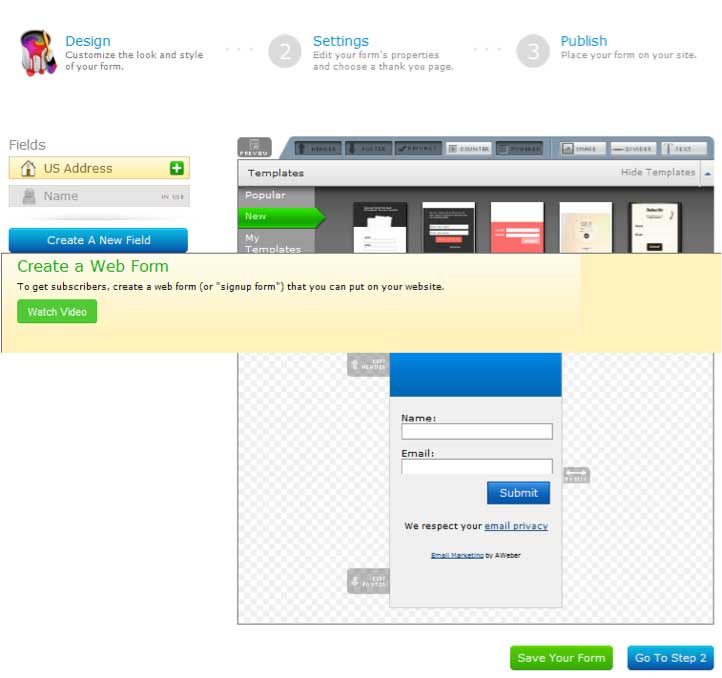
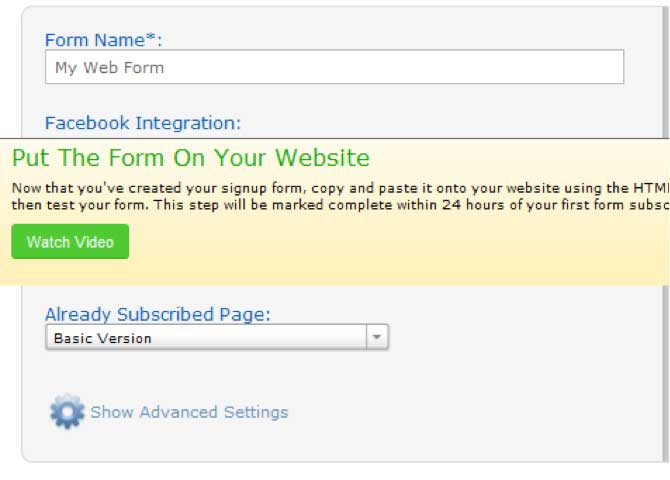
Step 6: Provide a name for your form. You want to create 2-3 forms at a minimum, so you can start testing out which one of them performs best. The great thing about AWeber WordPress forms is that you can change them in 10 seconds once they are set up.
Next, decide where you want clients to go once they are signed up to your email list. You probably do not want to go from creating value to selling immediately. However, this would be a good time to set up an appointment with a prospect. Sending them to a contact form with great benefits information and a free initial consultation will prompt some subscribers to contact you.
This page should have two ways to contact you: (1) a contact form that we will show you how to set up, and (2) a phone number, so those not as tech savvy can call you immediately. Never ignore emotional impulses. Use them as a conversion booster.
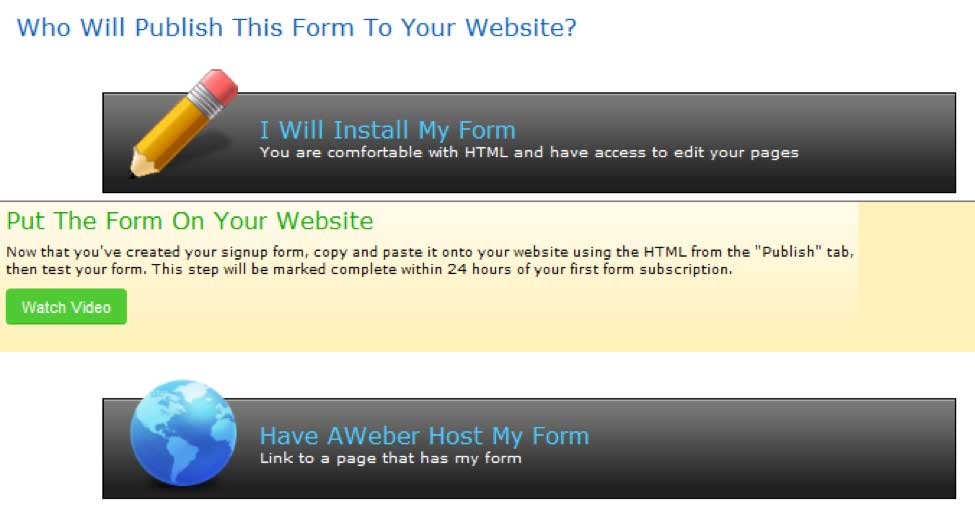
Step 7: Install the web form on your site. As we mentioned above, AWeber has an amazing plugin interface that you can use to set this up. However, in some cases, you might need the actual HTML code.
DO NOT FREAK OUT! You do not need to know coding. All this means is that you need to copy and paste the code from AWeber into your WordPress site. If you need to do that, click on the “I Will Install My Form” button, and then click the copy web form code button.
WordPress
Once you have WordPress and your email campaign set up, we need to organize WordPress to help you create a well-defined process for conversions.
While everyone’s sales funnel will vary, the general flow of your sales funnel on WordPress will go like this.
First, you drive traffic, your potential prospects, to a squeeze page. This is a special type of landing page focused on “squeezing” the visitor into your funnel. When you offer something relevant to your potential clients only the qualified prospects will want that information. They will sign up to your email list to get your free product. We have touched on this briefly above, and will go into more detail below.
Second, your email signups will go through the campaign you set up for them on either MailChimp or AWeber. Eventually they will get your regular email newsletter, but for now it is enough that they are on your list.
Third, from your email system you redirect them back to a specific landing page. This is where the idea of multiple lists becomes useful. You will want to make sure that you target specific prospects for each landing page, so the messages they receive are relevant to their interests. This is where you offer them an appointment, or just provide your contact information so they can call you with their questions.
WordPress Dashboard
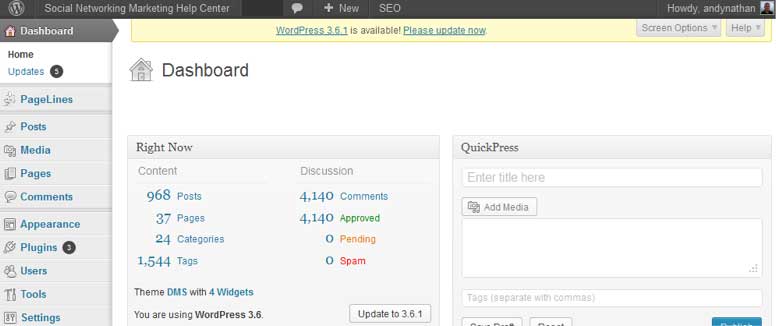
Before we explain how to set up the sales funnel, let’s spend a few minutes going over the basics of WordPress. This is by no means an in-depth review of WordPress. You can go on YouTube and find thousands of WordPress tutorials for a complete start to finish guide. Instead, this tutorial will teach the basics you need to know to create your sales funnel.
WordPress Themes
Installing a WordPress theme is pretty easy to do. You need to get the theme file if you are using a third-party theme like the ones discussed below, and then follow the install prompts below. WordPress automatically comes with the WordPress 2013 theme, which can be helpful, however it will probably not convey the professional image you are looking for in your practice.
While this is a solid theme, if you are looking to increase your conversions you will want to use professional themes to help establish your brand and increase conversions. Installing a theme is easy to do from your dashboard. You go to Appearance, then Themes, next click on Install theme. The two themes listed below are downloadable from their respective websites. Upload the file to your theme manager. Make sure the theme is activated as your primary theme, and you are done.
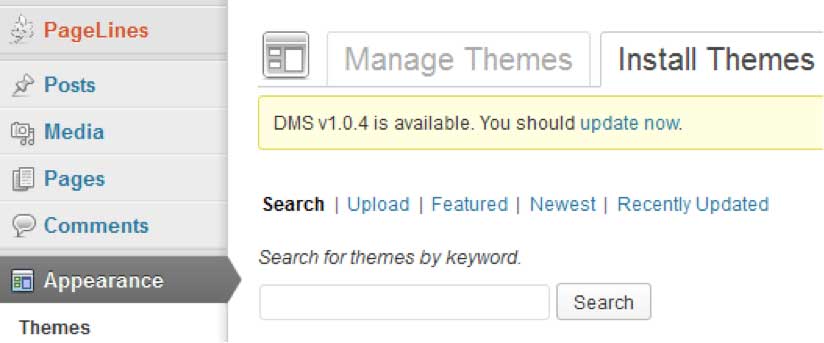
Pagelines DMS came out about two months ago, and it is part of a revolutionary line of new WordPress Themes that are changing how WordPress sites get built. While the Theme does have a few restrictions, considering this is a free theme (with paid premium options if you want more features), you can do a lot with it for your conversion process. The theme has a drag and drop editor where you can move different elements and sections of your site around to create the desired look and feel of your site.
Need to add a video? You can add an html box, where you can use a YouTube embed code. Need to add text content? You can add a text editor, where you can enter your page content. The framework is simple to use and the learning curve is low. Pagelines offers a full set of tutorials describing how to use the software and its many features if you have any questions.
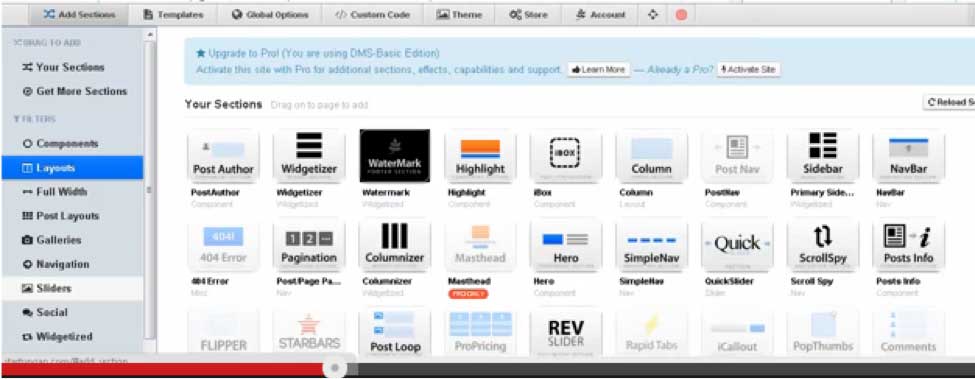
Note: The theme design only works on Google Chrome at the moment, so if you are using Internet Explorer you will need to install Chrome. Type in Chrome in Google Search to download Chrome to your computer. Google Chrome is a web browser like Internet Explorer or Mozilla Firefox.
StudioPress Generate Theme is part of the Genesis series of themes that the company produces. These are top-level themes you can use for your business. In your WordPress Dashboard, you will find a section devoted to all the features you can add with StudioPress. Genesis themes are easy to use, but the main reason we like the Generate theme is because it has a prominent email signup form that helps generate leads.
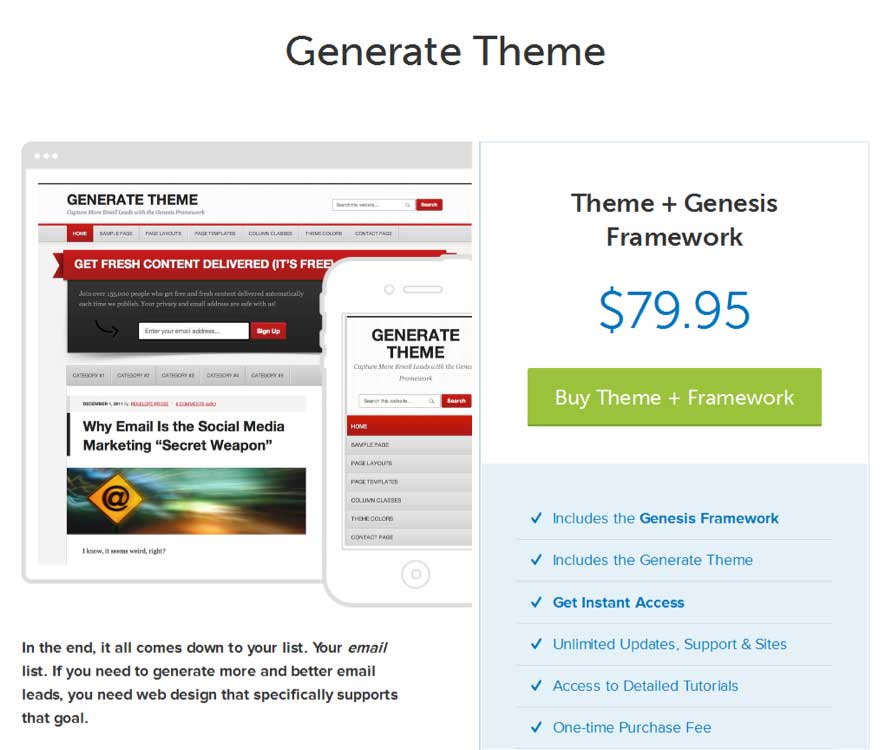
While you do not have to use the Generate Theme, we highlighted this theme for two reasons.
- The Theme has a prominent email signup form to help you gather new email subscribers. Notice how they just ask for an email address. That is because the more information you ask for in an email signup form the lower your conversion rate.
- The theme is designed to be responsive. This means that it works just as well on a mobile device or a tablet as it will on a regular computer.
WordPress Plugins
Next, you want to add some plugins for additional functionality. All the plugins that we will discuss here are available in the WordPress Plugin directory at: wordpress.org/plugins/. Currently, there are over 27,000 free plugins in the directory, and that does not include the additional premium plugins. Obviously, we cannot cover all of them here; however, here are the few plugins that you will definitely need.
To install a plugin, you go to the plugins menu on the left side of your Dashboard and click Add New. You can do a search, or if you have the file of the plugin from WordPress you can upload the file directly. Remember to activate the plugin. That is it.

AWeber WordPress Plugin
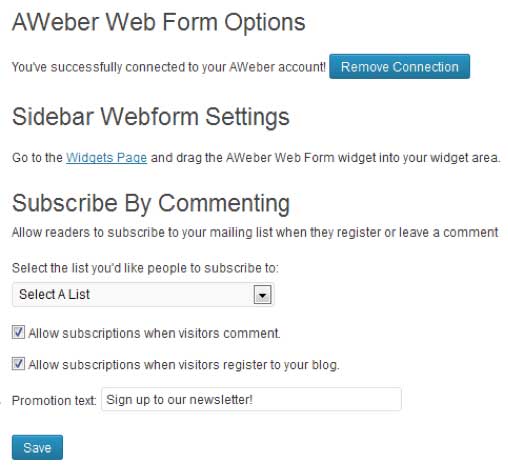
This plugin is the one we mentioned above when we discussed how to integrate WordPress and AWeber. You will need to connect the accounts through WordPress, which only takes a minute.
If you want to add web forms to the sidebar of your site, just click Widgets Page. The Widget Area allows you to have custom features like email sign up forms and social sharing. It is drag and drop. Move the Aweber Plugin box into the widget area, and then select the list and web form you want to use on the website.
Note: If you are using the themes email form, you might need to go to AWeber to copy the code like we mentioned in Step 7 of Aweber set up above.
MailChimp WordPress Plugin
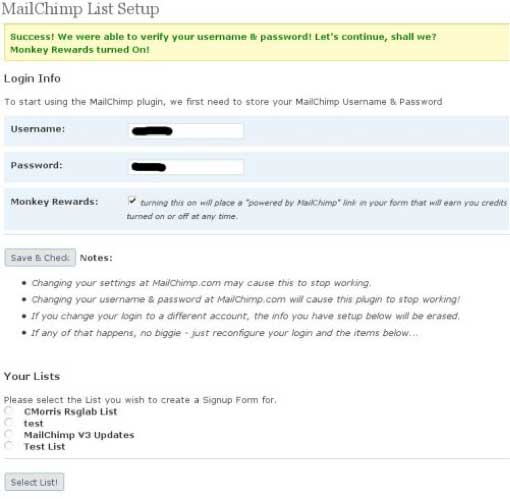
This plugin works similar to the AWeber plugin.
Contact Form 7
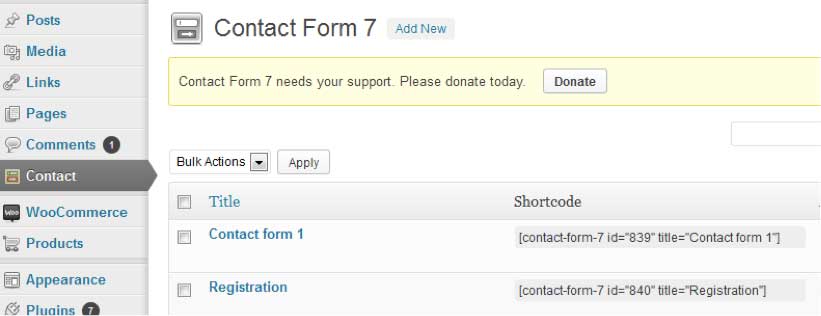
If you want people to contact you directly from the website definitely add your phone number. Also, include a contact form. Contact Form 7 sets up a basic form allowing your visitors to send you an email directly from the website.
The reason you might want to use a contact form, instead of displaying your email address, is twofold. First, spammers constantly sweep the web looking for email addresses to poach. Second, if you have a general contact form then you can have a point of contact forward the email over to the party who handles that specific information. That way, you do not have to confuse prospects with 20 email addresses.
Google Analytics
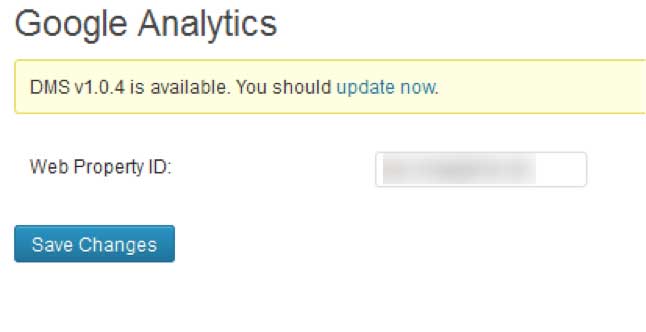
Next, you want to track everything your visitors do. If you do not have a Google Analytics account, set one up. You can connect it to your Gmail account, to set up the account in seconds. This plugin allows you to enable Google Analytics on your site by simply copying the UA code, which identifies the website for Google. Once enabled, it will properly track your website traffic.
Here is a brief list of other plugins that might not help with your conversions, but will keep your site running smoothly.
BackUp Buddy – This plugin can backup your entire site, database, and content on a schedule, or manually if you want. Additionally, it can upload the site contents to a third party cloud system like Amazon S3 or Dropbox. It is a paid plugin that has saved more sites than I care to admit.
WP Security – Unfortunately, we live in an age where hackers want to get into your site. Some have a reason, and others do it for fun. Either way, protect yourself with this free plugin.
GrowMap Anti-Spam Bot – You would be shocked at the amount of comment spam you can get on your site without a good comment spam blocker. GrowMap’s system works great, and is free. Akismet is a paid subscription that works smoothly as well.
WordPress SEO By Yoast – One of the best Search Engine Optimization plugins available. It is free and available in the WordPress plugin directory. This plugin is in the top 10 most downloaded plugins on WordPress.
Pretty Links Lite – The final plugin is extremely useful for tracking links. We will discuss this topic later in the section on testing. For now, just remember that when you need to create a user-friendly link out of the hot mess of a link that you sometimes get from Twitter, Facebook, Google, or other places, you can do it with Pretty Links.
Creating a Reason for Prospects to Join Your Email List
We now have all the basic technology set up to help you increase conversions. Now, we need to focus on crafting the right message to help you build your email list, as well as turn the subscribers it brings into clients.
Creating conversions is all about giving people a reason why they should work with you. Do you solve one of their pain points (divorce, lawsuit, etc.)? Can you provide them with quality advice to further their goals (setting up a corporation, creating a trust, etc.)?
The reality is that without having a clear understanding of your prospects you will not be able to convert anyone. So, to help you we created a brief 10-question survey that you should go through to start identifying your target market. Even if you have had a practice for years, things can change so clarifying who you want to talk to online every now and then is always a good strategy.
Remember that there is no right or wrong answer to the questions below. However, the insights you take away from the questionnaire will help you create a dynamic lead generation funnel targeted to your list.
- What type of services do you offer?
- What makes your products or services unique?
- Why do clients use your services?
- What is the biggest challenge you help clients overcome?
- Who is your ideal client? Are you working with them currently?
- If so, think about three specific clients that you have that embody your ideal client.
- How did your current ideal clients hear about you?
- What constitutes real value to your clients? How do they win?
- What is your call to action for prospects coming to you online?
- If you were to ask several clients what they thought of your services, what would they say?
Once you have answered the questions, you need to turn these answers into benefits for your clients. Converting readers into subscribers and then subscribers into clients is all about delivering value. The more value you provide to your audience, the more they will want to use your services and promote them to their friends and associates.
This is why we must understand exactly who we are talking to in the first place. Once we do that, we can create compelling copy that will help your prospects convert.
Creating Great Copy
Creating great copy that sells your services is not about what you write. As you have seen already when we walked you through the questions you need to ask to identify your target clients, creating great copy is about how you connect with who you are writing to on an emotional and logical level.
This is why we have not discussed what you need to write until now. Everything you write must fit with your audience. Consider a personal injury lawyer versus a corporate attorney. A personal injury attorney talks about how you were robbed of ABC because of a tragic event. I see many personal injury lawyers use words like “slip and fall,” “wrongful death,” and “get the settlement you really deserve” and other emotional words.
These ads say you are no longer helpless against others who harm you. For those going through a trying time, this type of advertising works great.
However, if you are working with business owners and professionals then you need to change your strategy. You focus not only on your years of experience, but how your company is “prompt,” “well-known,” understands the system,” and “provides you with quality advice.”
Both ads work, as long as you focus on the right audience. So, how do we create a picture with words that moves your prospect from subscriber to buyer? That is the secret to great copy.
The thing you need to keep brief is the headline. Think about this, you have 72 characters to change a would-be visitor into a client. What will you say in those few words? How do you move them towards action in this amount of space?
If you think this is a theoretical exercise, think again. Google gives your headline 72 characters of space before they cut your message short in listings on their search engine. WordPress warns you when you go over 72 characters as well.
Dan Kennedy, who we will discuss in greater length below, provides a few classical headline ideas that work wonders with prospects when used appropriately. The examples below will give you ideas, but make sure they fit with your audience.
Some examples are:
They didn’t think I could ________, but I did!
- · They didn’t think I could stop the billion dollar lawsuit, but I did!
- · They didn’t think I could set up a company that quickly, but I did!
Who else wants _______?
- · Who else wants to know how to purchase more properties in trust?
- · Who else wants to start up their own business in 1 week?
Are you _______?
- · Are you looking for comprehensive legal help without premium prices?
- · Are you in desperate straits with the government over taxes?
How to _______?
- · How to set up an LLC in 3 days?
- · How to set up a legal offshore account?
If you are _______, you can _______.
- · If you are tired of filing your legal papers every year, you can hire us instead.
- · If you do not understand ObamaCare, you can get help.
Give me _______, and I’ll _______.
- · Give me 15 minutes, and I’ll work out a long-term business structure.
- · Give me your basic company information, and I’ll start your LLC today.
_______ ways to _______.
- 7 ways to set up a company.
- 15 ways to stay up to date on state licensing procedures.
As you can see, the options for creating a dynamic headline are substantial. The key is to use a headline that fits your target market.
Sales Letter Formulas
Once you have a solid headline, we need to create a sales letter to close the sale. Furthermore, the sales letter is your main online vehicle for conveying your message to people without you individually connecting to all of your clients.
We follow a formula. Specifically, I will be referencing a lot of work here from the legendary direct sales guru Dan Kennedy. If you have never read his Ultimate Sales Letter book then it is definitely worth a look. I was a member of one of his GKIC chapters briefly, and the experience was invaluable.
Specifically we will look at two formulas he discusses when creating sales letters. Now, keep in mind that when you write online, you want to keep your content tight. You can make the sales letter a little longer, because at this point you have people interested in what you have to say. However, be conscious of your prospects’ time.
The formulas below will provide you with an outline of how to write effective sales messages. However, customize these approaches to fit your audience.
<h4=”problem”>Problem-Aggravate-Solve
Problem – Prospects come to you because they have problems. A random person off the street will not come into your office just because they saw your sign and decided to start a business right then and there. Instead, they wanted to start a business, and sought out legal help. Remind them of this problem either through a story or facts and statistics.
Aggravate – Next, you need to get your prospects upset about this problem. Detail the amount of paperwork they need to fill out to set up a company or how the new ObamaCare rules could potentially cost their company millions of dollars if done improperly.
Solve – Then solve their problem with your services. Show them the testimonials we discussed at the beginning of happy customers you helped with these exact problems. Demonstrate the benefits of using your services.
Attention-Interest-Desire-Action (AIDA)
Attention – Get your prospects’ attention. Again you can use a story or a single mind-blowing fact. Think about the fact that law firms spend close to $200 million per month on television advertising. What would happen if more of them used the AIDA direct marketing approach for their business?
Interest – You grabbed their attention, now keep them interested in how your services can benefit them.
Desire – Tap into your prospects’ passion for your product. How will this product reduce their fears about the future, fulfill their dreams and goals, make their life better?
Action – Like everything else with creating conversions online, you need to ask for the sale. Have a specific action at every step of your sales funnel asking your prospect to move forward. Better yet, ask more than once, because the first time will probably not work.
9 Specific Things You Need To Do When You Write Copy
- Keep your sentences short.
- If a six year old does not understand what you are writing then you need to simplify your writing.
- Keep paragraphs to three sentences or less.
- Bold, underline, and or italicize important words. While you should not overdo this, emphasizing important points is acceptable.
- Use bullet points to spell out benefits of your services. Note: A benefit is something you get from your services (e.g., increased security against lawsuits) versus a feature which is part of your service (e.g. low monthly retainer).
- Keep things personal. When writing a sales letter use words like “you” and “your” versus “her” or “they.”
- Repeat the important points. There is a good chance that most readers will scan your sales letter, which is why we use short sentences and paragraphs. By repeating what you say in different ways, you will increase the chance that readers will see the major benefits as they scan.
- Talk about what makes you different. There are thousands of attorneys in your area. What is your unique selling point (USP)? Do you hand deliver contracts to your customer’s office? What about the time you work pro-bono for a client as thanks for their years of patronage?
- Create Calls to Action throughout your sales letter.
- Bonus: Go that extra mile!
Make It Easy for Prospects to Contact You
You have a great sales letter explaining the benefits of your services. Now, close the deal. We keep talking about calls to action; now it is time to put some in place.
The biggest call to action you will have as an attorney will be for prospects to call you and set up an appointment. Therefore, place your phone number front and center on every page.
Additionally, make sure you have an email contact form. Many of your visitors will check out your site in the middle of the night. Unless you like calls at 3 in the morning, have a backup. Have an email contact form on your WordPress site using Contact Form 7 where prospects can ask you questions and you can get back to them in the morning.
During business hours you want to stick with phone, which is preferable for most clients. However, at night have a backup. Link to your email contact form on your about, sales, services, and other appropriate pages. Make sure that the contact form is easy to find on your contact page.
Testing, Testing… Is this thing working?
Up until now we have discussed how to create the best sales funnel possible to get the highest number of prospects to become clients. However, there is one more element that you need to learn to fully use internet marketing as a strategy for obtaining clients. That is testing. Test everything you do. Test the headlines, page layouts, copy, and calls to action.
Small changes can bring huge results. I have sent out emails where I only changed the headline, and it affected the open rate by 25%.
How do we test what works?
There are a few tricks of the trade that we will discuss below.
First, when you use a professional theme like Genesis, you can go to the “Pages” menu and hit duplicate page. This way if you want to test out anything on your website, you can do it in a controlled manner. All you need to do is drive a roughly equal amount of traffic to each page.
Remember to hide one of the pages from Google, because you do not want them to think you are creating duplicate content. With Yoast SEO, you can do this in seconds on the page itself.
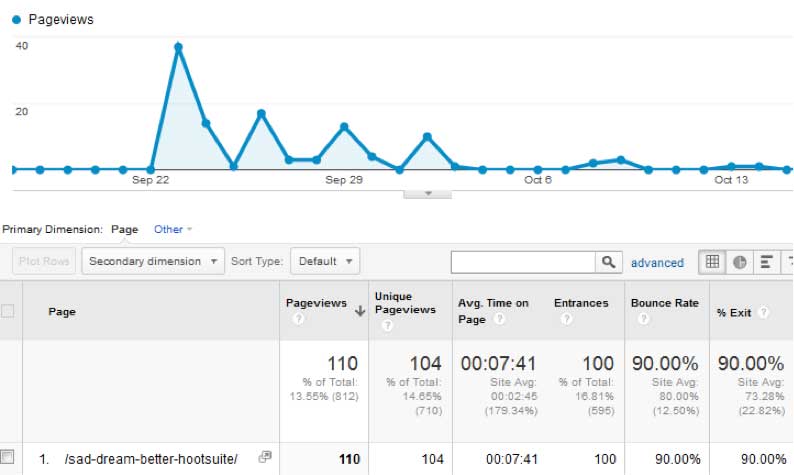
Second, we discussed Google Analytics before, but now we need to discuss this tool in greater detail. This tool can tell you everything about the traffic on your site, from how long people stayed on each page to where they went next after reading a specific post.
Third, AWeber and Mailchimp both have tracking tools as part of their platform. You can see how many people opened your emails, your click-through rate, and who opened your emails.
![]()
As you can see from the Mailchimp report above, you can easily track your email campaigns to see which emails are producing the highest responses.
Fourth, use Pretty Links. We discussed earlier putting links in your copy to your contact page. Instead of sharing the direct link to that page, go to your Pretty Links plugin, and create a custom link for your contact page. It will look like:
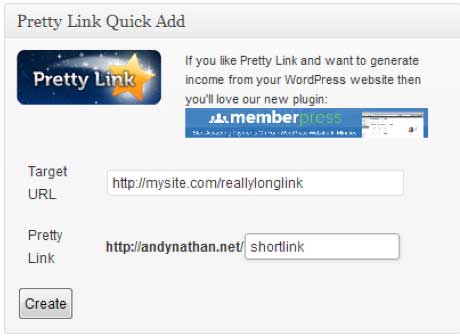
SiteName.Com/Contact
You can then share that link to track the number of clicks over to a site. This is also useful for testing ad clicks. You create a Facebook ad, and instead of creating 5 pages, create 5 pretty links to see which link gets clicked the most.
That way you know which ad is the most successful.
Fifth, use more than one phone number. With the proliferation of online phone numbers today, you can easily get a Google Voice, Vonage, and other low-cost Voice Over IP (VOIP) providers you can have calls going out to different numbers, and forwarded to one phone.
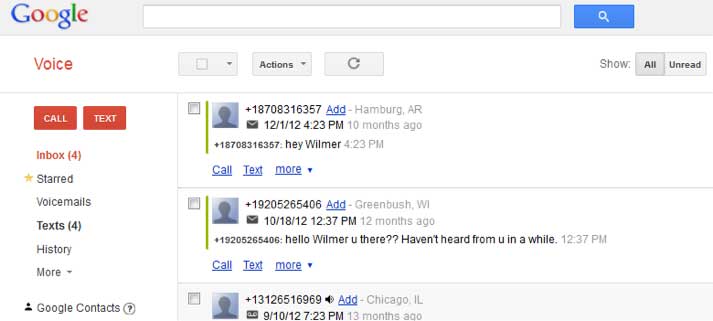
If you want to get more high tech, use services like Sonetel and Callture to get multiple lines under one service. Some come with features like auto attendant, voicemail to email, and after-hours mode to help you test your marketing more effectively.
Email Newsletter
Once you have a solid system in place, the final step is to keep in touch with your prospects. The reality is that the vast majority of prospects will not contact you right away. You need to work on your budding email list. Test what works, and discard the aspects that do not work well with your target audience.
The best way to stay in touch with your prospects is to create a regular email newsletter. You should keep your list updated at least once a month, so your list keeps you top of mind for your services. Otherwise, by the time they need your help they will likely forget about you.
Your email newsletter should still be about producing value. Make sure that you spend at least 50-60% of the newsletter on providing your list with useful information like new laws, legal tips, and things to watch out for in your business.
Just keeping your list informed will generate more inquiries than self-promotion.
However, spend some time letting your list know that they can contact you about their legal questions. Again, providing visible contact information in more than one spot is important.
In the end, you can write almost anything useful in a newsletter as long as you are consistent, and speak to your list’s needs and wants.
Converting Prospects into Clients
In the end, you will find that the more consistent you are in your online marketing the more prospects you will convert to clients. Keep your prospects’ needs and wants in mind at every step of the process. That way, you can create a sales funnel that focuses on their needs. The more you can create a dynamic funnel designed for your clients in mind, the greater your online marketing success will be.
Converting prospects into clients will not happen overnight. However, if you follow the steps discussed throughout this ebooklet, you should be successful.


